Table of contents
- Set up kiosk management
- Create QR Codes and assign them to persons
- Assign your own codes via import
- Create and assign time tracking regulations
- Activate kiosk
- Use kiosk
- Fixing the kiosk surface
Introduction
In addition to mobile time recording via smartphone or desktop, HRworks also allows you to record working hours at one or more locations via a kiosk system. Any desktop computer, laptop or tablet can be used for kiosk management. No additional hardware is required. Employees identify themselves via PIN and all administration is done via HRworks web access. To ensure a complete view, tablets should not be smaller than 9 inches.
1. Set up terminal management
The "kiosk management" function can be switched on in a few steps. If you are an administrator, open the "Time management/Time recording/kiosk management" menu in the left main navigation and create a new "Kiosk". Click the "New" button at the bottom of the screen and specify the name of the kiosk.

Specify whether employees at this terminal should identify themselves with a PIN or a QR code. Select one of the offered usage options accordingly. With "Direct identification and login", you enable employees to log in by presenting a QR code. If you choose "Automatic person selection, confirmation with pin", the employee's PIN is required in addition to the QR code. If you do not want to use a QR code, but only a PIN, select the "Do not use" option.

If you already have the required time recording regulation, assign them to the newly created kiosk below and save the process.

Activate the "Hide persons and only identify with QR code" checkbox if you do not want them to be displayed on the kiosk for selection.
Activate the "Continuous camera operation" check box if you do not want the camera of your kiosk device to switch off after a certain time. This means that it does not have to be reactivated when you stamp afterwards.
2. Create QR Codes and assign them to persons
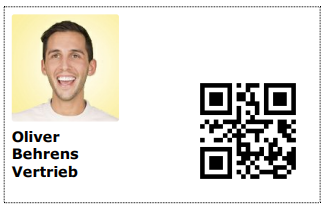
Create identity cards with QR Codes
Create cards for your employees to stamp in and out at different terminal devices of your company. To do this, open the “Admin/Time management/Time recording/Card creation” menu and select the desired employees by holding down the control key (CTRL).
Confirm the selection by clicking the “Next” button to define the layout of the badges in the next step.

Then decide which data should be displayed on the cards.
Each card contains a QR code that is automatically generated for each employee. This allows employees to clock in and out at the appropriately configured terminal devices. When you have set the details, confirm the process with "Create cards". 
The badges are created in PDF format and can then be printed on paper and laminated.
Generate and assign QR codes externally
You can also order QR codes for your employees' time tracking outside the HRworks software or create them yourself. For example, you can use any QRcode generator that converts the entered numeric codes into QR codes. This is how an online QRcode generator can look like:

You can assign these to the selected person in the "Admin/Persons/Persons" menu by right-clicking. For this, you need a kiosk device with camera access.

If you want to assign the created codes to all persons at the same time, use the import of persons. How to perform an import is explained in the next step.
3. Assign your own codes via import
First create a .csv/.txt file with all persons who should use QR Codes for their time recording.
The file should be structured as follows:
User ID; QR Code for Time Recording
Example: born; 45456fsdfsd
Then save the file in .csv/.txt format and upload it from the "Admin/Persons/Persons" menu using the "Import" button. Click on "Select file" → "Upload" and check the "Change existing persons" box so that the existing person data is not overwritten.

4. Create and assign time tracking regulations
For detailed information on creating and assigning the required time recording regulations, read the article "Time recording".
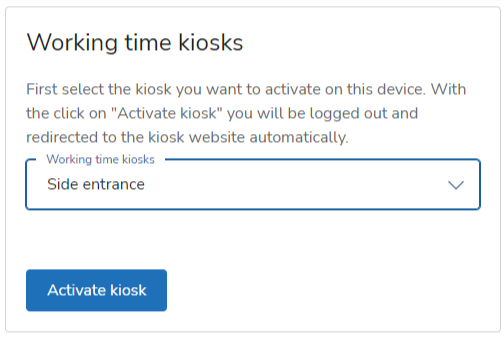
5. Activate kiosk
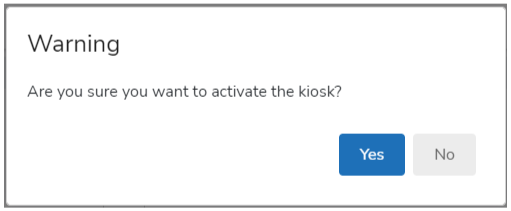
If you have successfully created the time recording regulations and assigned them to your employees, you can now activate your kiosk. Log in to the WebApp as an administrator on the required device and set up your newly created kiosk:
After you log out as an administrator, the device is registered as a kiosk. The following message confirms kiosk activation:
Note: As long as the automatically activated cookie is not deleted, the kiosk can be accessed on this device at any time via time-demo.hrworks.de/kiosk without further installation. Pay attention to the security settings of your browser, which can block the use of cookies.
Each employee receives his or her own PIN, which is displayed in the "Time management/Working hours" menu at the bottom of the screen.

With this or with the generated QR code, all persons can stamp themselves in and out of the assigned kiosk on a daily basis.
6. Use kiosk
Once you have placed the kiosk devices at the desired locations in your company, employees can now record their working hours via the kiosk interface. When they select their name, they are prompted to enter their PIN:


After a successful registration, the employee receives the following message:

If the employee stamps himself out at a kiosk, he receives a summary message about his recorded working time in detail:

If you as administrator have selected "Online and Kiosk" under "Allowed devices", employees can also record their working times in their own HRworks access. The working time button is available in all screens of your access and allows employees to start or stop time recording with just one click.

7. Fixing the kiosk surface
To allow employees to see the stamp interface directly on the kiosk device without having to open or change anything, lock the kiosk screen.
Open the terminal you have already set up on the device you want to use (tablet, laptop, etc.). In the browser options (usually three dots in the upper right corner), select the "Add to start screen" option. An HRworks icon will then automatically appear on the interface. Click the icon and set up the kiosk screen using the following steps:
Android-devices
iOS-devices
Windows-devices
- a) Fix Chrome as a picture on a screen
- b) Fix HRworks Time Recording Kiosk in Chrome