Table of contents
- Assign administrator role
- Adjust settings
- Create time tracking regulations
- Time account hours
- Break regulation
- Assign time tracking types
- Perform plausibility check
- Evaluate working times and create reports
Introduction
As an administrator, you can manage the entire working hours of your employees. Create and manage time recording regulation and define break and overtime regulations. You can also import working times, correct those already recorded, and evaluate them using the reports available in the system.
1. Assign administrator role
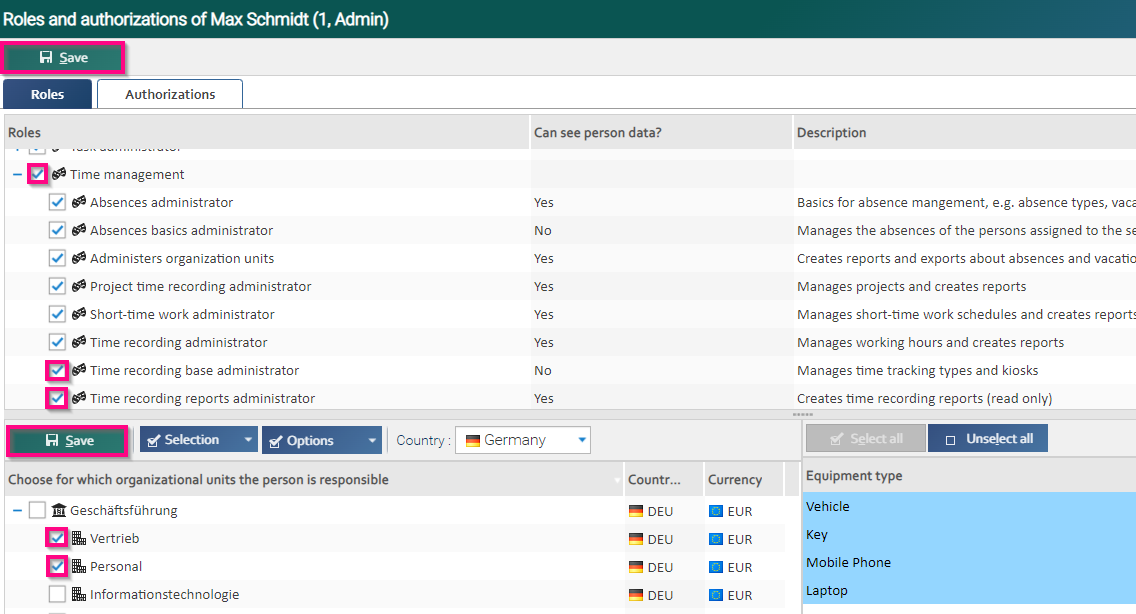
First assign the appropriate admin roles to the person responsible for time recording. As master administrator, open the admin-menu "Persons/Persons” by double-clicking on the corresponding name. Then set the checkbox “Time recording base administrator” and “Time recording reports administrator” in the employee-menu “Master data/Roles and authorizations/tab Roles - Time management”. In the lower part of the screen, select the organizational units for which the assigned role is to apply. Check the boxes in the desired fields and confirm your selection by clicking “Save”. The entire process is also completed with the upper “Save” button.
2. Adjust settings
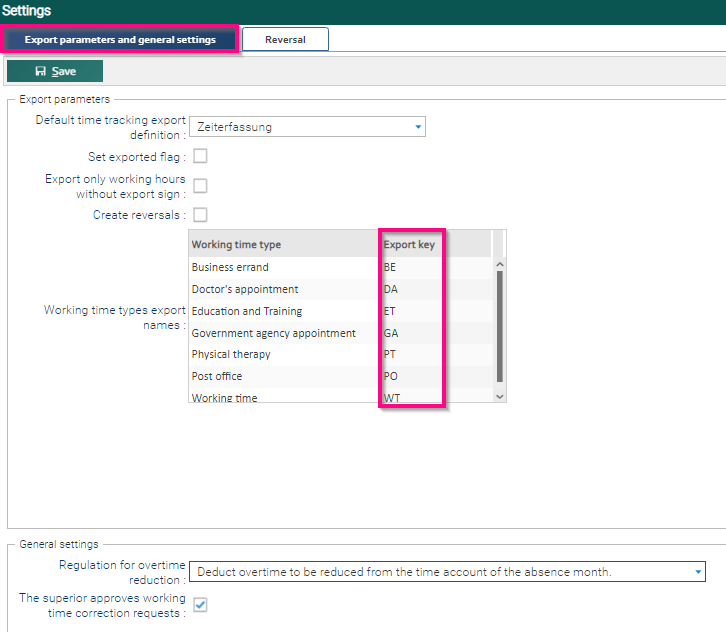
In admin-menu “Time management/Time recording/Settings” you can define parameters for the export of working times in the tab “Export parameters and general settings”. The export indicator distinguishes between working times that have already been exported. If a working time is changed after the export, the export indicator is also removed, since the working time no longer corresponds to the exported values.
You can specify that only working times without export indicators are exported. This prevents working times from being exported twice.
If working times that have already been exported are changed, you can specify that a cancellation is to be created. In the next export, this cancels the working time with the old values and exports it again with the changed values.
Enter the appropriate export keys for the working time types so that they are output in the export report.
Decide whether employees can only deduct their recorded hours from the month in which they applied for overtime reduction, or whether other months can also be reducted.
Important note: If you, as administrator, specify that the employee’s time account must not be overdrawn, minus hours can still occur in the following month due to the overtime carryover. The employee must have enough balance of overtime, to enter his overtime reduction request. Possibly, he could carry over fewer overtime hours to the next month due to missing working time after the request and thus slide into minus.

3. Create time tracking regulations
In admin-menu “Time management/Time recording/Time tracking regulations”, define how the working times of your employees are to be recorded. Online or via a terminal device, the calculation of times can be switched on and off with just one click.
Basics
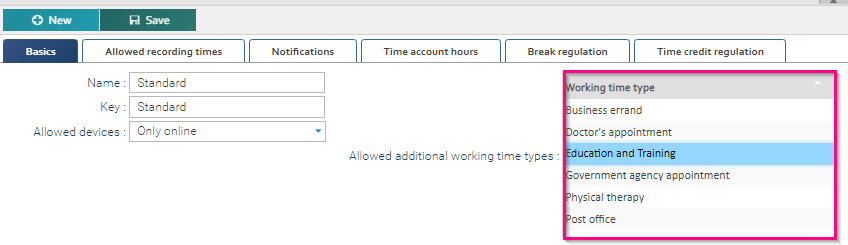
Select the button “New” inside the above mentioned admin-menu and enter all relevant information (such as name, key, allowed devices and allowed terminals) in the “Basics” tab.
If your employees are on the move during working hours, e.g. on business or during a visit to the doctor, you can activate these office absences as additional permitted "Working time types" within basics tab.
Note: If you would like to use terminal devices in your company for clocking in and out, refer to the article “Time recording via terminal system” for information on the entire terminal management.
Article "Time recording via terminal system"
Allowed recording times
On the “Allowed recording times” tab, you can define your company work period and a maximum number of hours per day. If an employee works beyond this period, this is not counted as working time. Note: This recorded time is not lost, It would be shown inside the reportings as "Cutted working hours".
In the “General” section you can set on the field “Period of manual editing”, whether employees are allowed to edit their own recorded working times. If the value is “0”, no subsequent processing is possible. For day entries, the period is valid from the current day into the past. For weeks and months, you can also enter data for the future up to the end of the current week or month.
The option "Clock in new working time in spite of open one after" you can set after how many hours (from 1 to 24), it should be possible to clock in again, even though an open working time exists.

Notifications
In the tab "Notifications" you can decide, who is in charge of working times, this means who should be get informed about changes (see aboved mentioned point "Period of manual editing") or by exceeding or fallen below working hours. Note: The notification would be part of the reminder mail.


Time account hours
In the tab “Time account hours”, you could specify the maximum number of hours by which your employees may overdraw the time account (to request overtime reduction). In addition, general settings regarding the "Overtime reduction", e.g. the maximum number of hours that can be carried forward to the next month. See also point 4 regarding this whole topic.
Break regulation
In the tab "Break regulation" you can define your desired kind of break regulations, e.g. time-dependent or variable break. In addition, here you can set General settings and further time dependent break regulations. See also point 5 regarding this whole topic.
Time credit regulation
In the tab "Time credit regulation" you can optionally add time credits after specific worked hours for the employees. The time credit could be apply between the options "Working time account" or "Recorded hours".
If you choose "Working time account", please note as follows:
By choosing this option, credit is not shortened by settings within the "Allowed working times" tab and cannot trigger a regulated break.
Note: Only the working time credit regulation with the highest applicable working hours will be applied.
If you choose "Recorded hours", please note as follows:
By choosing this option, credit will be shortened by setting "Maximum amount of working hours per day" within the "Allowed working times" tab and the final time for the day will be shortened to this amount.
Applied credit may trigger time-dependent breaks from the "Break regulation" tab, when the sum of the recorded hours plus time credit surpasses the threshold for the break regulation.
Credit is not applied to project times.
Further note: Only the working time credit regulation with the highest applicable working hours will be applied.
For both options applies: In the time account you can see the sum of all credit, which is applied to the end of month balance in a similar way to a time correction.
4. Time account hours
Overdrawing the working time account
You can allow employees to request absence types that debit the time account, even if the account is negative as a result. To do this, you can define how many hours the time account may be overdrawn.
Example: As an administrator, you have defined a maximum number of minus hours of 12 hours. An employee with a time balance of +2 hours requests a leave day with the absence type “Overtime reduction”. After approval, the time balance is – 6 hours. If the employee wants to request an entire leave day again, he or she would exceed the defined limit of -12 hours by 2 hours (6 + 8 = 14). In this case, the employee is not allowed to make the request.

Transfer to the next month
(Please also read the instructions in the following screenshots)
No overtime
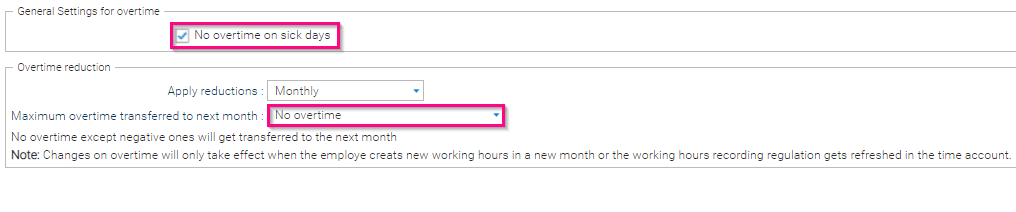
Here you can also specify whether overtime can be recorded on a sick day. Check this box if you do not want overtime to be credited to employees despite a sick leave. For example, if an employee records two hours of his working time and then reports sick for the whole day, these two hours are not credited to his time account.
Note: As soon as you make this setting, the time recording type for the current month must be reassigned to the employees. As of the following month, the setting is transferred automatically.
Entered amount of overtime
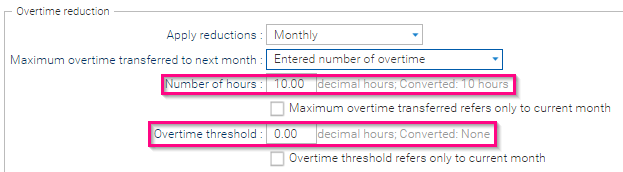
Here you can also specify whether overtime can be recorded on a sick day. Check this box if you do not want overtime to be credited to employees despite a sick leave. For example, if an employee records two hours of his working time and then reports sick for the whole day, these two hours are not credited to his time account.
Note: As soon as you make this setting, the time recording type for the current month must be reassigned to the employees. As of the following month, the setting is transferred automatically.
If you check the box “Maximum overtime transferred refers only to current month”, the entered value will only refer to accumulated overtime from the current month. Any positive overtime hours from previous months are transferred to the next month regardless of the threshold value.
Example: The maximum overtime threshold was set to 20 hours. In January, an employee recorded 15 hours of overtime and therefore did not exceed the threshold value. In February, the employee recorded 30 overtime hours. HRworks reduces this number of overtime hours to 20 hours and at the same time takes the January overtime hours into account. The total of the two months, that is, 35 hours, is transferred to March.
If you check the box “Overtime threshold refers only to current month”, the entered value will only refer to collected overtime hours from the current month. Any positive overtime hours from previous months are transferred to the next month regardless of the threshold value.
Good to know: The overtime threshold value can also be entered as a decimal number. It is important that this number is given as industrial hours (e.g. 8.25 hours = 8 hours 15 minutes). HRworks automatically converts these into hours and minutes.
All overtime
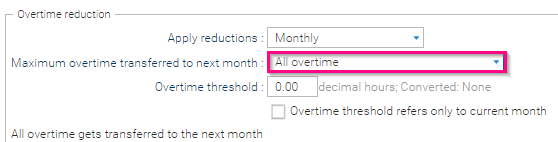
Here you can also specify whether overtime can be recorded on a sick day. Check this box if you do not want overtime to be credited to employees despite a sick leave. For example, if an employee records two hours of his working time and then reports sick for the whole day, these two hours are not credited to his time account.
Note: As soon as you make this setting, the time recording type for the current month must be reassigned to the employees. As of the following month, the setting is transferred automatically.
If you check the box “Overtime threshold refers only to current month”, the entered value will only be applied to overtime hours collected in the current month. Any positive overtime hours from previous months are transferred to the next month regardless of the threshold value.
Good to know: The overtime threshold value can also be entered as a comma number. It is important that this number is given as industrial hours (e.g. 8.25 hours = 8 hours 15 minutes). HRworks automatically converts these into hours and minutes.
Tip: How to enable employees to reduce their overtime hours can be found in the article “Absence management” under “Enable overtime reduction”.
5. Break regulation
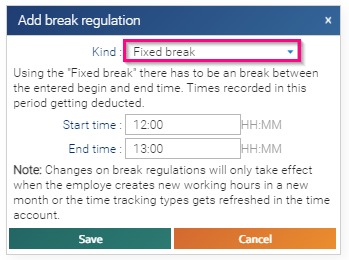
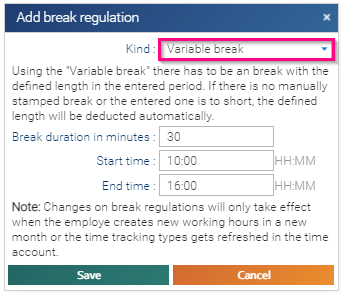
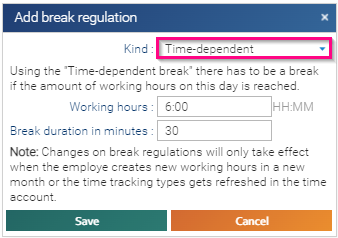
If you want to assign a break regulation to the time recording type, select the “Add” button on the “Break regulation” tab. You can exactly define a fixed, variable or time-dependent break regulations here.
Fixed break
Variable break
Time-dependent
Further time-dependent break regulations
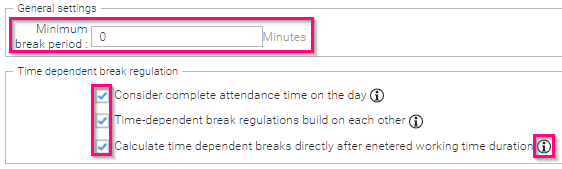
For further explanations regarding the "Further time-dependent break regulations", we highly recommend you to read the examples for each kind. You can reach the examples by clicking on the info-icon.

6. Assign time tracking regulations
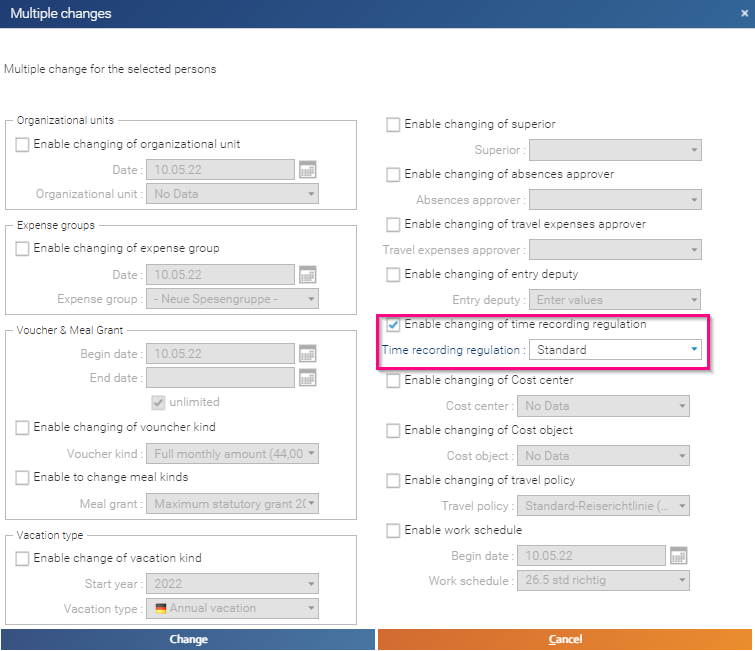
Then assign the created time tracking regulation to the employees. As an administrator, select the desired employees in the admin-menu "Persons/Persons” by holding down the control key (Ctrl) and right-click to make a “Multiple changes”. In the following dialog window, set the check mark “Enable changing of time recording regulation”. Select the corresponding time recording regulation and confirm the process by clicking on “Change”.
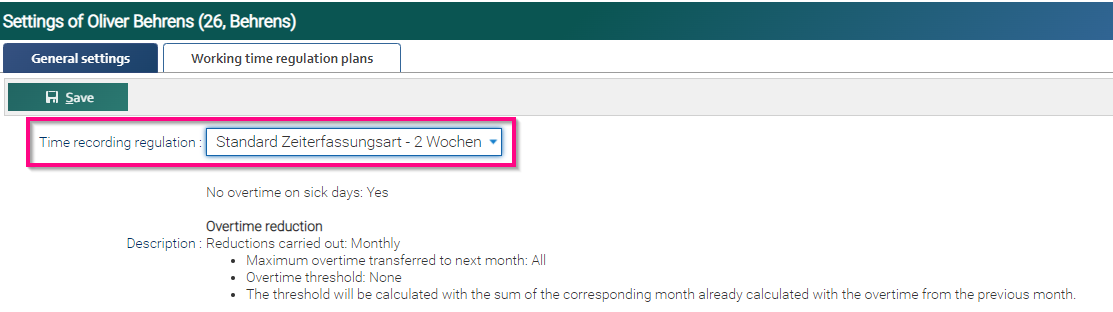
Note: When you create a new person, you can also assign the corresponding time recording type to this person directly under “Time management/Settings".
If you have a large number of persons, you can also assign time recording types using an import. This is done in the same admin-menu “Persons/Persons” by clicking on the button “Import”. Create a CSV file with User-ID and time recording type key. If you have any questions, our Customer Service Team will be happy to assist you.
You can also check the article "Change existing persons via Import" (Caution: At the moment only in German).
6. Perform plausibility check
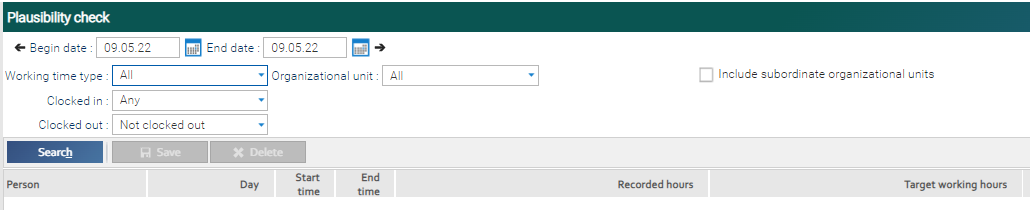
In the admin-menu “Time management/Time recording/Plausibility check” you can see the open working times of your employees. With a double click you can edit and complete the working times of your employees. You can also right-click to go directly to the employee’s working times. The filter can also be used to view certain working times. For example, you can display all employees who have clocked in themselves after 10 pm.
Edit time account and import corrections
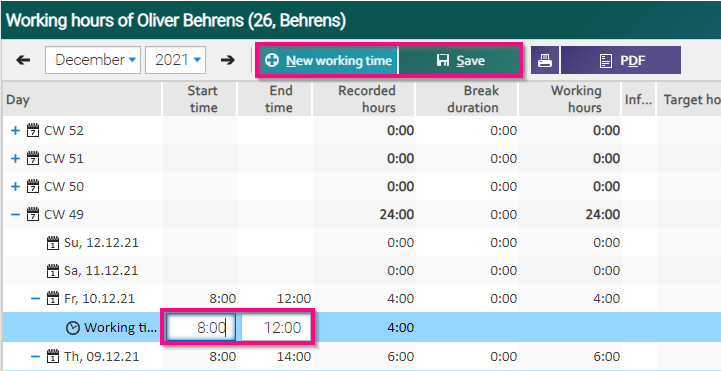
If the employees’ working times are incorrect or have been entered differently due to overtime, for example, you can edit them manually directly in the personal Time Management menus of the relevant employees. First double-click on the names of the employees to be edited admin-menu "Persons/Persons” and open the employee-menu “Time management/Working hours”. Select the desired calendar day here and enter the correct times in the fields by double-clicking. Complete the process with the “Save” button.
If you want to correct the working times of several employees, open the admin-menu “Time management/Time recording/Import”. Here you can either enter the corrections manually or upload them by importing a prepared CSV file. For a manual correction, select the “Upload → Time corrections” as well as the “New” button and create the correction lines. Enter the required information for the selected persons in the empty fields. In the “Correction amount” column, make sure that the time entries are entered in the correct format. These must consist of a sign (+/-) and the number of hours and minutes, separated by a colon (:). If necessary, enter remarks on the changes made.

After you have summarized all corrections, select the button “Import all” and transfer the recorded changes to the time recording menus of the respective employees. Confirm the import in the following window by clicking on “Yes”.
Optionally, you can create an import file for this. First click on the button “CSV template” and choose between "Time corrections" (see above mentioned example) or "Working hours" (exactly working times clocked in/out for specific dates). Then select the “Upload” button and choose again the relevant method. This process can also be completed by clicking on “Import all” and answering “Yes”.
Note: When recording working times, all changes made are logged. This does not include continuous stamping and unstamping, but various time recording corrections, changes to the start and end times and deleting the recorded entries.
7. Evaluate working times and create reports
In admin-menu “Time management/Time recording/Reports”, you can evaluate the working times of your employees.
The following reports are available, which you can create using HRworks:
Working hours per person, Working hours short overview, Working hours summary report, Working hours current overtime hours and Export of working hours (If an export format was set into your account).
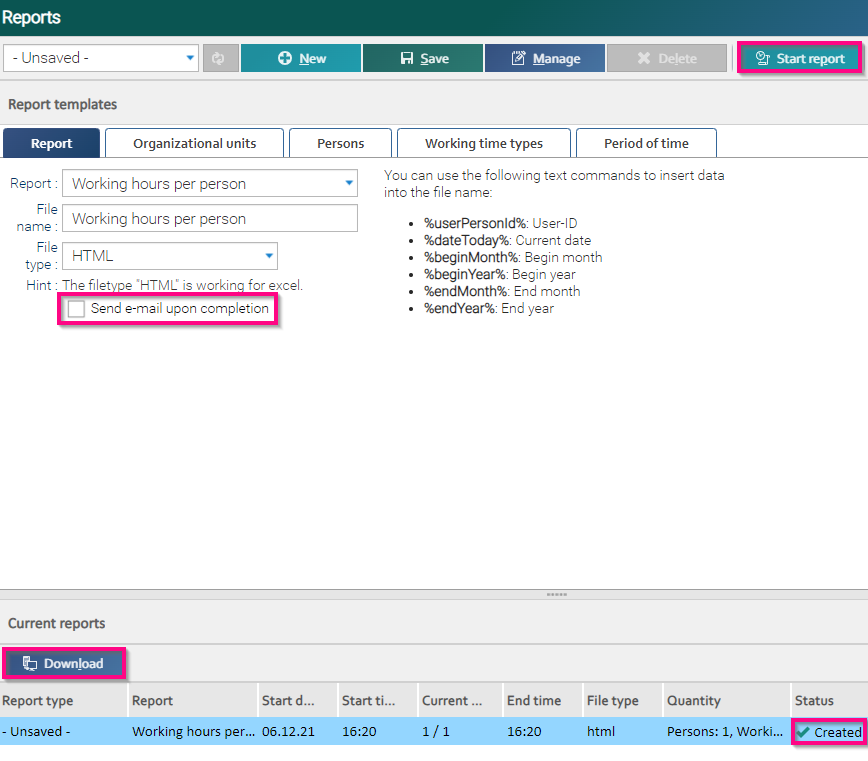
Select the desired report and file format from the drop-down menus. In the next tabs, determine which organizational units, persons and time period are to be included in the evaluation and click on “Start report”. If the status in the area below is “Created”, download the report by clicking on “Download” or by double-clicking.