Table of contents
- Assigning an administrator role
- Adjusting settings
- Executing financial accounting export
- Exporting digital receipts to financial accounting
- Creating reports
- Overview and explanation of travel expense reports
- Creating annual reports
- Configuring controlling reports
- Archiving travel expenses
- Overview of travel expense reports
Introduction
With HRworks, you create exports for transferring the trips to be accounted to payroll or financial accounting as well as various reports and annual financial statements. Numerous evaluations enable reporting according to projects, cost centers, employees or locations.
HRworks has a large variety of interfaces for transferring travel expenses to modern financial accounting systems. Export files are available in a few steps and manual posting is no longer necessary.
1. Assigning an administrator role
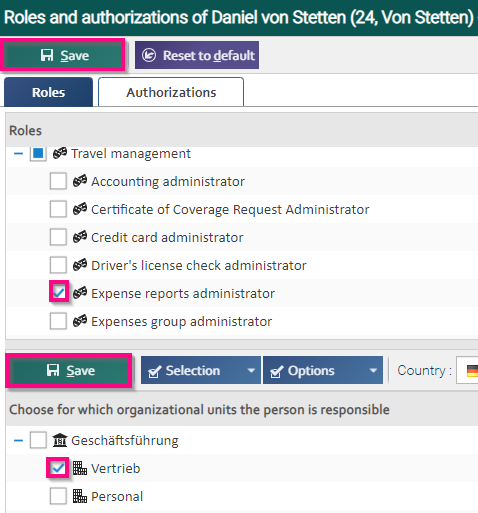
First assign the role of travel expense administrator to the person responsible for travel expense reporting. To do this, open the menu for this person as the master administrator under "Admin/Persons/Persons" by double-clicking on the corresponding name. Then, under "Travel Management" in the "Roles and Authorizations", place a check mark in the field for the relevant role. In the lower part of the screen, select the organizational units to which the assigned role should apply. Check the boxes in the desired fields and confirm your selection by clicking on "Save". The upper "Save" button also completes the entire process.
2. Adjusting settings
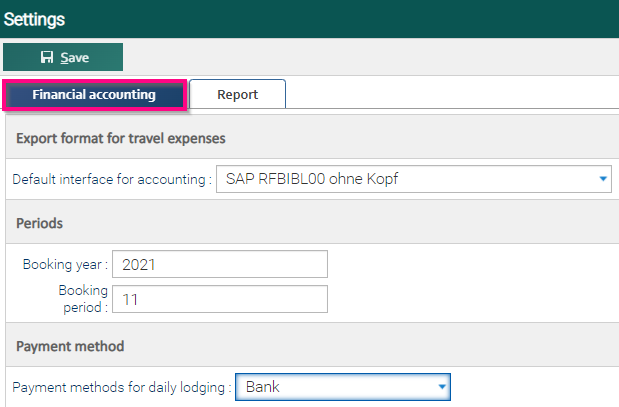
To define parameters for travel expense accounting, open the “Admin/Travel Management/Accounting/Settings” menu.
On the “Financial accounting” tab, make the settings for the financial accounting export. Under “Export format for travel expenses”, specify which financial accounting interface is to be used for the export.
If a posting year/period is to be transferred to financial accounting during export, enter the desired data in the "Periods" area. Select a payment type from the drop-down menu with which the per diems, accommodation and kilometer allowances as well as any advances are to be settled.
Note: Which fields are displayed in this mask depends on the respective interface.
On the "Report" tab, you make the settings for various reports.
Under "Tax office attestation" you can define which document types should be listed in this report by selecting the desired document types.
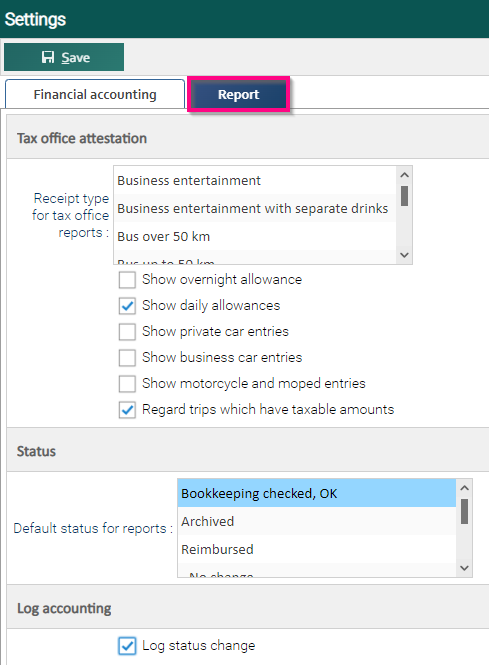
Select a status in the selection that should be set as default for the evaluation of travel expenses. The status "Bookkeeping checked, OK" includes e.g. all travel expense reports that have already been checked by accounting.
If you want accounted trips to be logged additionally, set the checkmark in the "Log accounting" area.
Note: The logged settlements can then be found in the “Admin/Travel management/Accounting/Accounting” menu.

In the menu "Admin/Basics/Organizational units" on the tab "Travel expenses/Booking parameter" you define in the area "Invoicing" the value with which the mileage in the "Cost object report" should be calculated for further accounting.

If you want Google Maps to calculate the mileage within the travel expense report, you can request a separate “Google Maps API Key” in the Google API Console. You can find out how to do this here (German).
You enter your API key in the "Admin/Basics/Settings → General settings" menu. To make this setting, you need the "Basics administrator" role.

3. Executing financial accounting export
To transfer the posting records to financial accounting, you perform a financial accounting export. All information stored in HRworks and required for posting is transferred to financial accounting via an export file. G/L accounts and VAT keys are stored in the document types. If the traveling employee has selected a document type, the corresponding posting record has already been generated automatically in the background. Separate accounts can be defined for per diems, accommodations and mileage allowances, which are then addressed when the travel expenses are transferred to financial accounting.
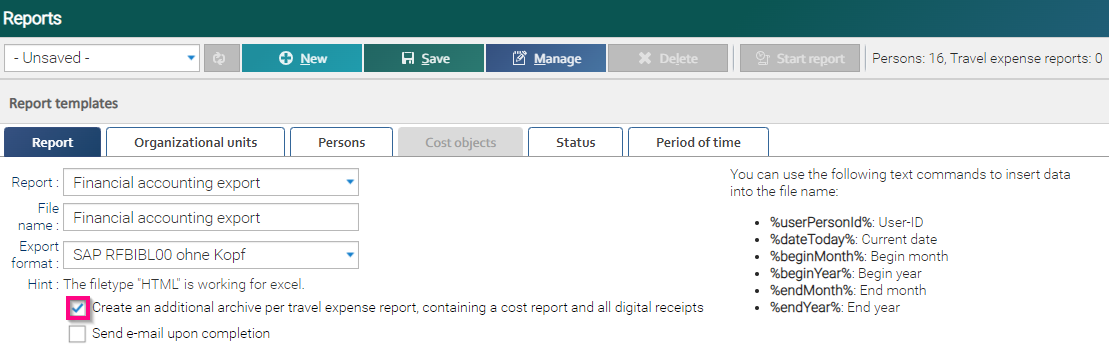
Open the "Admin/Travel management/Accounting/Reports" menu and select in the "Report" tab the financial accounting export from the drop-down menu for importing the data into your financial accounting. Then select the interface through which the export file will be created.

Then check the settings on other tabs.
Under “Organizational units”, select all the organizational units whose data you want to export to financial accounting. Note that the selected report cannot be created for different countries at the same time.

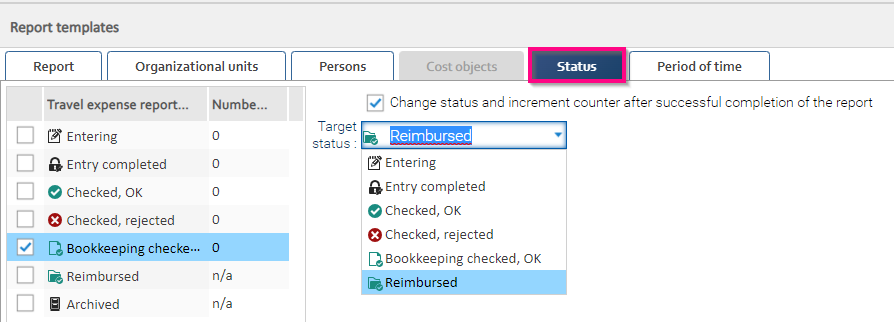
To avoid exporting the same travel expenses multiple times and to set the status of the travel expenses to "Reimbursed", "Bookkeeping checked, OK" must be selected on the "Status" tab. Then check the "Change status and increment counter after successful completion of report" and select the "Reimbursed" status from the drop-down menu.
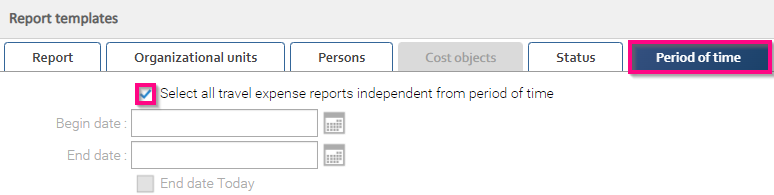
On the "Period of time" tab, decide whether all travel expense reports should be reimbursed regardless of the date or select the start and end dates manually.
Then click on the “Start report” button in the upper right corner to start the report creation process. Next to the button you can see how many persons and travel expense reports are evaluated.

Once the status in the lower part of the screen is "Created", you can access the report by double-clicking on it or using the "Download" button.
In the following message, click on "Download report" and edit it in your target system. If the data has been successfully transferred to financial accounting, confirm the process with "Change status".

The following dialog box informs you about the status change. As soon as "Progress" is set to "Finished", all travel expenses will be reimbursed. Now complete the entire process by clicking on the corresponding button.

4. Exporting digital receipts to financial accounting
When exporting digital receipts to your financial accounting system, it is possible to create an additional ZIP archive. This contains a PDF file with a cost report and all associated digital receipts for each exported travel expense report. As administrator you create the archive in the menu "Travel management/Accounting/Reports". By checking the box, you specify that an expense report with digital receipts should also be created as an archive for all travel expense reports.
You can define the file name of the cost report yourself in the “Admin/Basics/Output Format/Export definition” menu. Create it from the saved blocks and click on “Save”.

5. Creating reports
You can create reports for different organizational units, persons, defined periods and trip statues in a few steps. With a mouse click you can get the desired reports in .html/.pdf/.xml format.
In the menu "Admin/Travel management/Accounting/Reports" you can create different reports about travel expenses and save report templates.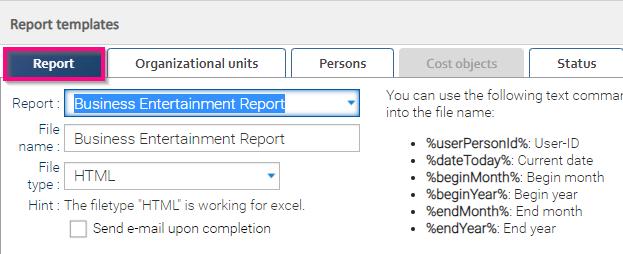
First select the template “-Unsaved-” and make your settings in the individual tabs.

To create reports for all organizational units, select one or more organizational units on the “Organizational units” tab. By default, all organizational units are selected here.
If you want to create reports on persons, first deselect the active selection using the "Deselect all" button via the "Organizational units" and select the persons to be evaluated in the "Persons" tab.
When creating a "cost object report" or a "Controlling report per Cost object", you can select one or more cost objects for evaluation on the "Cost objects" tab. To do this, move the selected cost objects from the lower to the upper part of the screen using drag and drop or the "Add" button.

On the "Status" tab, select the status of the travel expense reports and receipt folders to be evaluated. The default value is "Accounting checked, OK". You can also specify here whether the travel expenses should be set to a different status after the settlement has been completed.
On the "Report" tab, select the report you want to create. To create the report, click the "Start report" button. The button is active only if trips or document folders are found for evaluation via the set search criteria. The report is created at the bottom of the page under "Current reports" and can be accessed by double-clicking or clicking the "Create report" button. For further editing, you can either open the report directly with Excel or simply copy and paste it into the spreadsheet program.
6. Overview and explanation of travel expense reports
Number of days abroad per person
– evaluates foreign trips
– shows which employee was on the road how many days and in which country
– this information is usually relevant for insurance companies.
Travel policy exceptions and violations
– is related to the use of the function for travel funds orders
– evaluates the exceptions that occur during the trip in relation to the defined travel policy
List of receipts
– displays all receipts for a trip
– a entertainment expense statement is output here with
Cycle time report
– here you can see how many days were required for a business trip to complete the billing process.
– thanks to this evaluation the possible problems in the workflow can be recognized
– the report can be configured individually in the “Processing times” menu
Orders by supplier
– this report displays rail, hotel, car rental, and flight orders by different providers
Business entertainment report
– displays the costs, as well as which persons were entertained at which location for which occasion
Controlling Report per Cost Center
Controlling Report per Cost Object
Controlling Report per Organizational Unit
Controlling Report per Person
– All controlling reports are an exact list:
– of the flat rates received
– the reductions made
– all costs per document type
– they make possible, for example:
– evaluate the hotel costs at home and abroad
– evaluate the costs of the tip in detail
– the reports can be configured individually in the “Controlling” menu
(see Configure controlling reports)
Vehicle report
– displays the travel costs per vehicle
– all kilometres are grouped by company car and private car
– all other costs related to the vehicles (petrol, parking, etc.) are also displayed in this report
Financial accounting report
– is a posting report for manually posting travel expenses if no interface is used to transfer the data.
– all debit and credit postings are listed individually in this report
Financial accounting according to impersonal accounts
– is a posting report for manually posting travel expenses if no interface is used to transfer the data
– this report lists all debit and credit postings grouped by G/L account
Financial accounting report per person
– is a posting report for manually posting travel expenses if no interface is used to transfer the data
– all debit and credit postings per person or vendor account are listed in this report
Cost report
– detailed listing of all costs per trip for control by the employee
– also displays the entertainment expense statement
– is usually printed out by the employee and submitted to the accounting department with the travel expense report
Cost report with trip protocol
– detailed listing of all costs per trip for control by the employee
– displays the entertainment expense statement
– including travel protocol
Cost object report
– overview of costs per cost object, broken down by person
– individual kilometre flat rates are issued here
– these are transmitted to customers for further calculation
Payroll accounting list
– list of all values required for payroll accounting:
– tax-exempt meals allowances
– flat-rate taxable values
– fully taxable assets
– wages & salaries
Monthly report per person
– evaluation of travel expenses with flat rates and receipt costs per day
Private vehicle report
– list of all journeys with the private vehicle
– kilometre distances and packages included
– also required for the presentation of insurance policies
Travel arrangements report
– summary of all orders of travel means
Cost report
– detailed report on travel expenses, listing all cost details
– compared to the Controlling report, not all costs per document are displayed here in detail
Trips and countries
– here employees are displayed with all trips per country and number of days
– in comparison to the report “Number of days abroad per person”, the days in Germany are also counted and summarized here
SEPA export
– is the import file for the online banking program, in order to be able to carry out the transfers
– Is only required if the financial accounting program cannot create a comparable file itself
Sum report
– number of trips incurred and their total costs as well as amounts paid out to employees
– totalizes the costs per trip and per employee
– a compact report that shows travel expenses for the entire last year
7. Creating annual reports
In the “Admin/Travel management/Accounting/Annual reports” menu, you can create annual reports (certificate for submission to the tax office; gifts to business partners) on accounted travel expenses.
To create reports for all organizational units, select one or more organizational units on the "Organizational units" tab. The default setting here is all organizational units.
On the "Report" tab, you can select the desired report by fiscal year and create it by clicking the "Start report" button. The button is active only if trips or voucher folders are found for evaluation using the search criteria set in the tabs.
The report is created in the lower part of the screen under "Current reports" and can be accessed by double-clicking or by clicking the "Download" button.
Gift to business partners

Attestation for the tax office

Saving settings as report template
To save your settings as a report template, click on the "Save as Template" option in the "Admin/Travel management/Accounting/Reports" menu at the top of the screen. To create a new report template, click on "New". The report template will be offered for selection in the top drop-down menu. If you select it, you will not have to reassemble the search criteria next time, but you can directly click the "Start Report" button.
Note: Please note that any changes you make to search criteria will be automatically saved in the selected template.
Existing templates can be modified or reordered by clicking the "Manage" button. Double-click to change the template name and drag and drop to change the order.

8. Configuring controlling reports
In the “Admin/Travel Management/Accounting/Controlling” menu, you can configure which data the controlling reports should output per person/ per organizational unit/ per cost center/ per cost object. The data set here applies to all controlling reports.

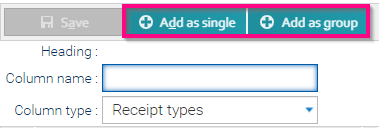
To add a receipt type to the report, select "Receipt types" from the column type drop-down menu on the right side of the screen. Select one or more receipt types from the list of receipt types while holding down the control (CTRL) key and click the "Add as single" button. Each receipt type will be added as a single column.
Alternatively, you can select the documents and drag them to the list of output fields on the left. To output all selected receipt types in one column in the report, click the “Add as group” button.
Note: New receipt types created by the travel expense base administrator are not automatically listed in the controlling reports, as these reports can be customized.
9. Archiving travel expenses
With HRworks you archive your travel expenses completely directly in the travel expenses software. Archived trips can no longer be changed or deleted and are available for evaluation at any time. You save time for additional work steps and additional costs for archiving software.
You archive the accounted travel expenses in the menu “Admin/Travel management/ Accounting/Archiving”. Archived travel expense reports can then neither be changed nor deleted.
In the upper part of the screen, enter the date up to which the travel expense report is to be considered. Settlements up to this date will be taken into account during archiving. Settlements after this date will not be included in the archive.
In the "Organizational units" area you can restrict the departments for which archiving should apply. Start the archiving process by clicking on the "Start archiving" button.
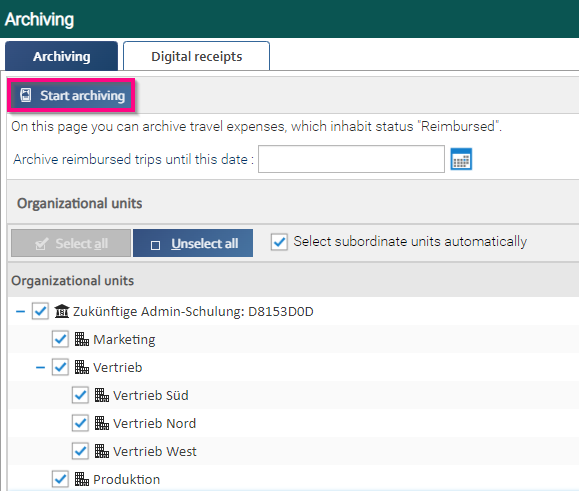
Enter the word “Archive” in the following dialog window and confirm with “Ok”.

In the lower part of the screen, you can follow the progress of the archiving process.
10. Overview of travel expense reports
In the menu “Admin/Travel Management/Accounting” you can see the travel expense reports that have been set to the status “Reimbursed” in HRworks. To enable the Accounting Log, tick the Reports tab in the "Administrator/Travel Management/Accounting/Settings" menu: “Should any change in status of trips be logged to the status Reimbursed so that a report can be viewed?”
For “Begin date” and “End date”, select the period over which you want to see when travel expenses were set to “Reimbursed”.
